This time around, Samsung has kept today’s chef in view. Samsung has introduced a knife, named as Galaxy Blade Edge. The name says it all, it’s a smartphone embedded in a knife, that has a blade on the edged-side. Galaxy Blade Edge sports almost all the features that the Galaxy S6 & Galaxy S6 Edge do, the only addition to this device are the cutting capabilities in the Edge. With the launch of Galaxy Blade Edge, Samsung aims at making the ordinary Chef knives obsolete. Samsung says that the Galaxy Blade Edge is so “Strong & Sharp. 
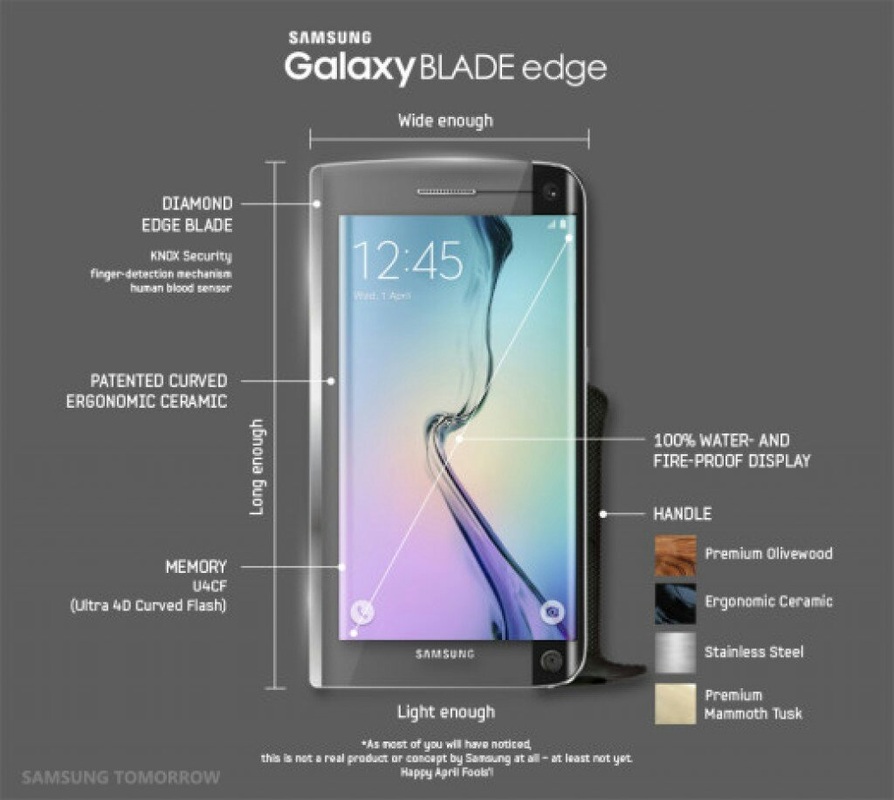
According to Samsung, the Galaxy Blade Edge powers up some specific sensors, and some particular algorithms have been used to build this device that make it 50% faster then the ordinary kitchen knife. There are different options to cut & chop different stuff in this knife. There’s a sensor that helps this device to detect whether it’s cutting the stuff or it’s going to touch your skin. The finger detection capabilities of this device help it to draw back the blade before it cuts your skin. Samsung aims to innovate a Chef’s life by introducing the Galaxy Blade Edge.
0 Comments
Sprint LG G2 VS980 users can test Android 5.1.0 via Resurrection Remix [v5.4.0]. Soon, I am going to write the step-by-step tutorial for updating Sprint LG G2 LS980 to Android 5.1 Lollipop using Resurrection Remix [v5.4.0]. This is really an outstanding news for LS980 owners who are bored with old firmware and planning to test Lollipop 5.1 on LS980. Resurrection Remix [v5.4.0] may bring many improvements on LS980. ÷ Important Points: •LG2 LS980 users will be able to install Android 5.1 via Resurrection Remix [v5.4.0] easily without facing any issue after reading the steps written in below. •Resurrection Remix [v5.4.0] requires rooted LS980, so it is essential to root LS980 before installing Resurrection Remix [v5.4.0]. Another crucial thing is CWM recovery installation on LS980 before installing Resurrection Remix [v5.4.0]. You can perform all these works after unlocking LS980 bootloader. Don’t forget that you may face some bugs on your LS980 after installing Resurrection Remix [v5.4.0]. •Androidromfix recommends that LS980 users must take a backup of their data including videos before installing Android 5.1 via Resurrection Remix [v5.4.0], as there is a chance of data loss from their LS980. If you are waiting for Lollipop 5.1, then you must use Resurrection Remix [v5.4.0] on your LS980. The important thing is that Resurrection Remix [v5.4.0] will let you enjoy Lollipop 5.1 on LS980. Resurrection Remix [v5.4.0] is released for Custom ROM lovers who are waiting to test all features of Lollipop 5.1 on LS980. *Disclaimer: Androidromfix provide various Firmware Updates and Rooting process along with Custom ROM,Modes,file are all belong to their owners/developers. The autor of this site or the developers are not responsible, if you damage or brick your device.Do it on your own risk and follow the instruction properly. ÷ How to Install Android 5.1 Lollipop Resurrection Remix [v5.4.0] ROM on Sprint LG G2 LS980 [Tutorial] 1. It is the time to download Resurrection Remix [v5.4.0] for LS980. 2. Gapps must be downloaded for LS980. 3. It is the proper time to activate USB debugging. 4. It is the perfect time to attach LS980 with desktop. 5. It is the time to transfer Resurrection Remix [v5.4.0] and Gapps to LS980. 6. It is the time to switch off device. 7. It is the time to remove the USB cable from LS980. 8. It is very crucial to put your LS980 into Recovery Mode. 9. It is the time to tap “wipe data/factory reset” on LS980. 10. It is the time to click “wipe cache partition” on device. 11. It is the proper time to tap “install zip from SD card” for installing Resurrection Remix [v5.4.0] on your LS980. 12. It is the time to choose Resurrection Remix [v5.4.0] on LS980. 13. It is the time to install Resurrection Remix [v5.4.0] on LS980. 14. It is the time to go to the main menu on LS980. 15. It is the time to click “reboot system now” on device. 16. It is the time to wait until device restarts. After your G2 LS980 is rebooted, you can test Resurrection Remix [v5.4.0]. If you are facing difficulty while installing Resurrection Remix [v5.4.0] on LS980, then don’t hesitate to share your issue with Androidromfix. Double tap features is really awesome feature and also it helps us save our power button by using it less. First this features was introduced in LG G2 and LG G3. Today i’ll tell how you can install double tap on Nexus 6, you can easily install double tap feature on Nexus 6 because it already has the capability for double tap to wake built in. But for some reason Google didn’t enabled it on Nexus6. You don’t need to root your Nexus 6 in order to install double tap to wake feature, here’s how to get double tap to wake on Nexus 6. Follow all the instruction carefully in order to get double tap to wake on Nexus 6. Step#1: Download thedouble tap to wake on the Nexus 6 Step#2: Boot your device into recovery mode, press and hold Volume Down and Power. Step#3: Use volume key to scroll and press power button to select recovery. Step#4: Now press and hold volume up button to enter in recovery menu. Step#5: Tap on install in recovery mode. Step#6: Now Tap download. Step#7: Select the Zip file you downloaded in first step. Step#8: On your screen swipe to right in order to confirm the installation. Step#9: After you see success message, Reboot your Nexus 6. All Done, You have successfully installed double tap to wake on Nexus 6. If you face any sort of problem please do tell me in comments. AT&T Samsung Galaxy S4 SGH-I337 users can test Android 5.1.0 via CM12.1 [jflteatt]. Soon, I will discuss about the steps for updating S4 SGH-I337 to Android 5.1 Lollipop using CM12.1 [jflteatt]. This is really a stunning news for SGH-I337 owners who are waiting to test Lollipop 5.1 on their SGH-I337. CM12.1 [jflteatt] may bring several improvements on SGH-I337. ÷ Important Points: • AT&T S4 SGH-I337 users will be able to install Android 5.1 via CM12.1 [jflteatt] easily without facing any issue after following the steps written in below. • CM12.1 [jflteatt] requires rooted AT&T S4, so it is essential to root SGH-I337 before installing CM12.1 [jflteatt]. Oh yes, the crucial thing is CWM recovery installation on SGH-I337. You can perform all these works after unlocking SGH-I337 bootloader. Don’t forget that you may experience several bugs on your SGH-I337 after installing CM12.1 [jflteatt]. •Androidromfix recommends that SGH-I337 users must take a backup of their data including videos before installing Android 5.1 via CM12.1 [jflteatt], as there is a chance of data loss from their SGH-I337. If you are waiting for Lollipop 5.1, then you must use CM12.1 [jflteatt] on your SGH-I337. The important thing is that CM12.1 [jflteatt] will let you enjoy Lollipop 5.1 on SGH-I337. *Disclaimer: Androidromfix provide various Firmware Updates and Rooting process along with Custom ROM,Modes,file are all belong to their owners/developers. The autor of this site or the developers are not responsible, if you damage or brick your device.Do it on your own risk and follow the instruction properly. ÷ How to Install Android 5.1 Lollipop Unofficial CyanogenMod 12.1 [jflteatt] ROM on AT&T Samsung Galaxy S4 SGH-I337 [Tutorial] 1. It is the time to download CyanogenMod 12.1 [jflteatt] for your phone. 2. Gapps must be downloaded for SGH-I337. 3. It is the proper time to activate USB debugging. 4. It is the perfect time to attach phone with desktop. 5. It is the time to transfer CM12.1 [jflteatt] and Gapps to the SD card of phone. 6. It is the time to switch off SGH-I337. 7. It is the time to remove the USB cable from SGH-I337. 8. It is very crucial to put your SGH-I337 into Recovery Mode. 9. It is the time to tap “wipe data/factory reset” on SGH-I337. 10. It is the time to click “wipe cache partition” on SGH-I337. 11. It is the proper time to choose “install zip from SD card” for installing CyanogenMod 12.1 [jflteatt] on your SGH-I337. 12. It is the time to choose CyanogenMod 12.1 [jflteatt] on SGH-I337. 13. It is the time to install CyanogenMod 12.1 [jflteatt] on phone. 14. It is the time to go to the main menu on SGH-I337. 15. It is the time to click “reboot system now” on SGH-I337. 16. It is the time to wait until your phone restarts. After your AT&T S4 SGH-I337 is rebooted, you can test CM12.1 [jflteatt]. If you are facing difficulty while installing CM12.1 [jflteatt] on SGH-I337, then don’t hesitate to share your issue with Androidromfix. Samsung Galaxy S5 SM-G900I users can test Android 5.1.0 via CM12.1 [kltedv]. below are the step-by-step tutorial for updating Samsung Galaxy S5 SM-G900I to Android 5.1 Lollipop using CM12.1 [kltedv]. This is really a glorious news for SM-G900I owners who are bored with KitKat and waiting to test Lollipop 5.1 on their S5 SM-G900I. CM12.1 [kltedv] may bring several improvements on S5 SM-G900I. ÷ Important Points: •S5 SM-G900I users will be able to install Android 5.1 via CM12.1 [kltedv] easily without facing any issue after reading the steps written in below. •CM12.1 [kltedv] requires rooted SM-G900I, so it is essential to root SM-G900I before installing CM12.1 [kltedv]. The crucial thing is CWM recovery installation on SM-G900I. You can perform all these works after unlocking SM-G900I bootloader. Don’t forget that you may experience several bugs on your SM-G900I after installing CM12.1 [kltedv]. • Androidromfix recommends that S5 SM-G900I users must take a backup of their data including videos before installing Android 5.1 via CM12.1 [kltedv], as there is a chance of data loss from their SM-G900I. If you are waiting for Lollipop 5.1, then you must use CM12.1 [kltedv] on your SM-G900I. •The important thing is that CM12.1 [kltedv] will let you enjoy Lollipop 5.1 on S5 SM-G900I. *Disclaimer:
Androidromfix provide various Firmware Updates and Rooting process along with Custom ROM,Modes,file are all belong to their owners/developers. The autor of this site or the developers are not responsible, if you damage or brick your device.Do it on your own risk and follow the instruction properly. ÷ How to Install Android 5.1 Lollipop Unofficial CyanogenMod 12.1 [kltedv] ROM on Samsung Galaxy S5 SM-G900I [Tutorial] 1. It is the time to download CyanogenMod 12.1 [kltedv] for your phone. 2. Gapps must be downloaded for SM-G900I. 3. It is the proper time to activate USB debugging. 4. It is the perfect time to attach SM-G900I with desktop. 5. It is the time to transfer CM12.1 [kltedv] and Gapps to SM-G900I SD card. 6. It is the time to switch off SM-G900I. 7. It is the time to remove the USB cable from SM-G900I. 8. It is very crucial to put your SM-G900I into Recovery Mode. 9. It is the time to tap “wipe data/factory reset” on SM-G900I. 10. It is the time to click “wipe cache partition” on SM-G900I. 11. It is the proper time to choose “install zip from SD card” for installing CyanogenMod 12.1 [kltedv] on your SM-G900I. 12. It is the time to choose CyanogenMod 12.1 [kltedv] on SM-G900I. 13. It is the time to install CyanogenMod 12.1 [kltedv] on SM-G900I. 14. It is the time to go to the main menu on SM-G900I. 15. It is the time to click “reboot system now” on SM-G900I. 16. It is the time to wait until phone restarts. After your S5 SM-G900I is rebooted, you can test CM12.1 [kltedv]. If you are facing difficulty while installing CM12.1 [kltedv] on SM-G900I, then don’t hesitate to share your issue with Androidromfix. A couple of HTC One M9 apps ported for devices running Android 5.0, which means you ca install it over your Samsung Galaxy or Sony Xperia or LG G3 or any device that’s basically running Lollipop. Right now, only two apps are aailable, HTC Music and HTC Gallery, and hopefully these are first of many — you’d want Blinkfeed on your Galaxy too, right? The Gallery apps consists of basic media browser app, plus the photo editor, while HTC Music app is host to features like music visualizer, album art, lyrics, etc.. ÷ How to Install You’ll need a custom recovery like TWRP recovery, using which you can flash the .zip file of the apps, to install them on your Android 5.0 device. Download Links:
HTC Music HTC Gallery Only two apps are available for now. We’dd add more as and when apps become available. Samsung Galaxy S3 I9300 Android 5.1 Lollipop Via Unofficial CyanogenMod 12.1 ROM [How To Install]3/29/2015 Galaxy S3 model (GT-I9300), featuring the new Android 5.1 update viaCyanogenMod 12.1 ROM. The experimental build seems to be much smoother and quicker, but some settings from Android 5.0.2 are missing, and the navbar icons are too big. ÷Bugs fixed •Messenger crash (fix with installation of textra --> play store) •Camera does not work (fix with installation of Kamera Zoom FX --> play store) ÷Open bugs/problems •Encryption does not work (try the fix mentioned here, which does not work, but does not get stuck in broken recovery) Head over to the guide if you want to manually install CyanogenMod 12.1 ROM featuring Android 5.1 on your Galaxy S3. ÷Important Points: •Before following the installation guide, create backup of all important data of the phone using custom recovery. •Enable USB Debugging on the phone to connect it with the computer and use Android SDK with it. [Navigate to Settings>> About phone. Tap on Build Number several times until a message appears saying 'You are now a Developer.' Now enable USB Debugging Mode by navigating to Settings>> Developer Options.] •The Galaxy S3 should have above 80% battery charge to avoid power off during the process which could damage the device. •The phone should be rooted with the latest recovery system installed on it. Also, it should have an unlocked bootloader. •As the AOSP ROM is in beta stage, bugs are highly likely. •The Android 5.1 Lollipop CyanogenMod 12.1 beta ROM works with Galaxy S3 I9300. Flashing this on any incorrect variant might brick the device. Therefore, verify the model number of the device. •After flashing the ROM if the device gets stuck on booting animation or experience boot loop then perform wipe cache partition and wipe dalvik cache for a few times before rebooting the device. •Once the ROM is installed, users are advised to give 10 minutes to the ROM after the device boots up for the first time for better user experience. *Disclaimer:
Androidromfix provide various Firmware Updates and Rooting process along with Custom ROM,Modes,file are all belong to their owners/developers. The autor of this site or the developers are not responsible, if you damage or brick your device.Do it on your own risk and follow the instruction properly. ÷ How to install Android 5.1 Lollipop on Galaxy S3 with unofficial CyanogenMod 12.1 ROM Step 1: Download CyanogenMod 12.1 experimental ROM your PC. Step 2: Copy the downloaded file your phone's internal storage and remember the location Step 3: Download TWRP recovery on your S3. (Check the above download link) Step 4: Boot the phone into recovery mode. Switch off the phone. Then press Power + Home + Volume Up buttons together until the TWRP logo appears on the screen Step 5: In the recovery mode, create a backup of the current ROM. Go to the recovery menu and select Backup and do a swipe on the Swipe to Back Up option on the bottom of the screen Step 6: Once the process is completed, perform Wipe of Data, Dalvik cache, Cache and System Step 7: Return to the main recovery menu and select Install then head over to the location where you have saved the ROM, select it and click Swipe to Confirm Flash option. Wait until the installation is completed Step 8: Perform Wipe Dalvik Cache again Step 9: Now reboot the phone, go to the recovery menu and select Reboot>> System Step 10: When the phone boots up, skip all the settings and reach home screen Step 11: Reboot the phone again to recovery mode Step 12: Flash Gapps file following the similar process how you install the CM12.1 ROM Step 13: When Gapps file is installed, navigate to the TWRP main recovery menu and select Reboot>> System. That All. Now the tremendous news is that P880 users can test Android 5.1.0 via AOSP [stable]. I am going to discuss about the step-by-step tutorial for updating LG Optimus 4X HD P880 to Android 5.1.0 Lollipop using AOSP [stable]. This is really a tremendous news for P880 owners who are bored with old firmware and eagerly waiting to test Lollipop 5.1.0 on their P880. AOSP [stable] may bring some improvements on LG Optimus 4X HD P880. The most important thing is that AOSP [stable] will let you enjoy Lollipop 5.1.0 on P880. ÷ Important: •LG P880 users will be able to install Android 5.1.0 via AOSP [stable] easily without facing any issue after following the steps written in below. •Dear LG P880 owner, AOSP [stable] requires rooted LG P880, so it is essential to root P880 before installing Android 5.1.0 via AOSP [stable]. Well, the key thing is CWM recovery installation on P880. My dear friend, you can do all these works after unlocking P880 bootloader. Don’t forget that you may experiencing several bugs on P880 after installing Android 5.1.0 via AOSP [stable]. •Androidromfix recommends that P880 users must take a backup of their documents including videos and songs before installing AOSP [stable], as there is a possibility of losing all documents including videos and songs from their P880. If you are a lover of Custom ROM, then you must use AOSP [stable] on P880. *Disclaimer:
Androidromfix provide various Firmware Updates and Rooting process along with Custom ROM,Modes,file are all belong to their owners/developers. The autor of this site or the developers are not responsible, if you damage or brick your device.Do it on your own risk and follow the instruction properly. ÷ How to Install Android 5.1.0 Lollipop AOSP [stable] ROM on LG Optimus 4X HD P880 [Tutorial] 1. It is the time to download AOSP [stable] for your P880. 2. Gapps must be downloaded for your phone. 3. It is the proper time to activate USB debugging. 4. It is the time to attach LG phone with desktop. 5. It is the time to send AOSP [stable] and Gapps to P880 memory card. 6. It is the time to switch off your LG phone. 7. It is the time to remove the USB cable from your device. 8. It is very crucial to put your LG phone into Recovery Mode. 9. It is the time to tap “wipe data/factory reset” on your device. 10. It is the time to click “wipe cache partition” on P880. 11. It is the time to choose “install zip from SD card” for installing AOSP [stable] on your LG phone. 12. It is the time to choose AOSP [stable] on P880. 13. It is the time to install AOSP [stable] on P880. 14. It is the time to go to the main menu. 15. It is the time to click “reboot system now”. 16. It is the time to wait until your LG phone restarts. After your LG P880 is rebooted, you can test Android 5.1.0 via AOSP [stable]. Dear friend, if you are facing any issue while installing AOSP [stable], then don’t hesitate to you must share your issue with Androidromfix. Best regards.. Now the glorious news is that S5 LTE SM-G900F users can test CM12.1 [klte]. Today, I will post the steps for updating Samsung Galaxy S5 LTE SM-G900F to Android 5.1 Lollipop using CM12.1 [klte]. This is really a glorious news for S5 LTE SM-G900F owners who are waiting to test Lollipop 5.1 on their SM-G900F. CM12.1 [klte] may bring some improvements on your SM-G900F. The most important thing is that CM12.1 [klte] will let you enjoy Lollipop 5.1 on SM-G900F. ÷ Important: •S5 LTE SM-G900F users will be able to install CM12.1 [klte] easily without facing any issue after following the steps written in below. •Dear S5 LTE SM-G900F user, CM12.1 [klte] needs rooted SM-G900F, so it is important to root S5 LTE SM-G900F. Another crucial thing is CWM recovery installation on S5 LTE SM-G900F before installing CM12.1 [klte]. You can do all these tasks after unlocking your S5 LTE SM-G900F bootloader. You may experience several bugs on S5 LTE SM-G900F after installing CM12.1 [klte]. •Androidromfix recommends that S5 LTE SM-G900F users must take a backup of their documents including contacts and messages before installing CM12.1 [klte], as there is a possibility of losing all documents including contacts and messages from their SM-G900F. If you are a fan of Custom ROM, then you must use CM12.1 [klte] on S5 SM-G900F. *Disclaimer: Androidromfix provide various Firmware Updates and Rooting process along with Custom ROM,Modes,file are all belong to their owners/developers. The autor of this site or the developers are not responsible, if you damage or brick your device.Do it on your own risk and follow the instruction properly. ÷ How to Install Android 5.1 Lollipop Unofficial CyanogenMod 12.1 [klte] Custom ROM on Samsung Galaxy S5 LTE SM-G900F [Tutorial] 1. It is the time to download unofficial CyanogenMod 12.1 [klte] for your S5 SM-G900F. 2. Gapps must be downloaded for your SM-G900F. 3. It is the proper time to activate USB debugging. 4. It is the perfect time to attach your device with desktop. 5. It is the time to transfer CyanogenMod 12.1 [klte] and Gapps to SM-G900F memory card. 6. It is the time to switch off your SM-G900F. 7. It is the time to remove the USB cable from your device. 8. It is very crucial to put your SM-G900F into Recovery Mode. 9. It is the time to tap “wipe data/factory reset” on SM-G900F. 10. It is the time to tap “wipe cache partition” on SM-G900F. 11. It is the proper time to choose “install zip from SD card” for installing CyanogenMod 12.1 [klte] on your SM-G900F. 12. It is the time to choose CyanogenMod 12.1 [klte] on S5 SM-G900F. 13. It is the time to install CyanogenMod 12.1 [klte] on S5 SM-G900F. 14. It is the time to go to SM-G900F main menu and then you will have to click “reboot system now”. 15. It is the time to wait until your device restarts. After your S5 SM-G900F is rebooted, you can test CM12.1 [klte]. Dear friend, if you are facing any issue while installing CM12.1 [klte], then you must share your difficulty with Androidromfix. Best regards S4 Mini GT-I9190 users can test CM12.1 [serrano3gxx]. I will post the steps for updating Samsung Galaxy S4 Mini GT-I9190 to Android 5.1 Lollipop using CM12.1 [serrano3gxx]. This is really an amazing news for GT-I9190 owners who are eagerly waiting to test Lollipop 5.1 on their GT-I9190. CM12.1 [serrano3gxx] may bring some improvements on your GT-I9190. The most important thing is that CM12.1 [serrano3gxx] will let you enjoy Lollipop 5.1 on GT-I9190. ÷ Important: •S4 Mini GT-I9190 users will be able to install CM12.1 [serrano3gxx] easily without facing any issue after following the steps written below. •Dear GT-I9190 owner, CM12.1 [serrano3gxx] requires rooted S4 mini, so it is essential to root GT-I9190 before installing CM12.1 [serrano3gxx]. Well, the key thing is CWM recovery installation on S4 mini. My dear friend, you can do all these works after unlocking S4 mini bootloader. Don’t forget that you may experiencing several bugs on GT-I9190 after installing CM12.1 [serrano3gxx]. •Androidromfix recommends that GT-I9190 users must take a backup of their documents including videos and songs before installing CM12.1 [serrano3gxx], as there is a possibility of losing all documents including videos and songs from their GT-I9190. If you are a lover of Custom ROM, then you must use CM12.1 [serrano3gxx] on GT-I9190. *Disclaimer: Androidromfix provide various Firmware Updates and Rooting process along with Custom ROM,Modes,file are all belong to their owners/developers. The autor of this site or the developers are not responsible, if you damage or brick your device.Do it on your own risk and follow the instruction properly. ÷ How to Install Android 5.1 Lollipop Unofficial CyanogenMod 12.1 [serrano3gxx] ROM on Samsung Galaxy S4 Mini GT-I9190 [Tutorial] 1. It is the time to download CyanogenMod 12.1 [serrano3gxx] for your GT-I9190 2. Gapps must be downloaded for your phone. 3. It is the proper time to activate USB debugging. 4. It is the perfect time to attach S4 mini 3G with desktop. 5. It is the time to transfer CM12.1 [serrano3gxx] and Gapps to GT-I9190 memory card. 6. It is the time to switch off your GT-I9190. 7. It is the time to remove the USB cable from your device. 8. It is very crucial to put your device into Recovery Mode. 9. It is the time to tap “wipe data/factory reset” on your device. 10. It is the time to tap “wipe cache partition” on S4 mini 3G. 11. It is the proper time to choose “install zip from SD card” for installing CyanogenMod 12.1 [serrano3gxx] on your GT-I9190. 12. It is the time to choose CyanogenMod 12.1 [serrano3gxx] on GT-I9190. 13. It is the time to install CyanogenMod 12.1 [serrano3gxx] on GT-I9190. 14. It is the time to go to the main menu. 15. It is the time to click “reboot system now”. 16. It is the time to wait until your S4 mini 3G restarts. After your S4 Mini GT-I9190 is rebooted, you can test CM12.1 [serrano3gxx]. |
Archives
November 2016
Categories
All
|